Automate Workflow with WPforms and Zapier
Own a traditional physical business or run e-Commerce online gig, the rapid pace of technological change can create challenges for businesses across industries as they increasingly incorporate with multiple social media channels and Online Shared places to monitor & manage progress, to uphold brand and success, one must go along with technology trends and constant changes.
It is vital to understand these connections recognizing their interconnectedness and rebalancing human and technological resources to address challenges effectively. Evaluating routine business cycle if it involves; Answering Customer requests on Social Media, sending same emails over and over, developing marketing campaigns, sharing data sheets with peers, Uploading new products and so on… and that all to be accomplish in limited time. Assigning additional human resources for similar and/or repeated tasks is not a cost-effective solution.
How to do more in less time? The straightforward answer is : “Automation”.
In this Blog Post I will show you how you can Leverage the Power of WPForms Pro with Zapier Add-on and easily connect your forms to numerous web applications to add more functionality and automation.
With WPForms Pro & Zapier addon tool you can connect your apps and move information across platforms automatically, it can automate more than 3,000 apps in countless ways, this can;
- Connects your apps to automate repetitive tasks
- Moves info between your web apps automatically
- Save WPForms uploads to Google Drive
- Saves Files and Media to Cloud, (DropBox, Google Drive, etc..)
- Save new WPForms entries to a Google Sheets spreadsheet
- Create new Google Calendar events from WPForms entries
- Post new WPForms entries to a Slack channel
- Create Salesforce leads from new WPForms entries
- Get SMS messages for new WPForms entries
- Adds New Lead to CRM or Support Platform
- Adds Important Task to “to-do-list” and so much more…
How to Add Zapier Addon for WPForms
Head to your Dashboard » WPForms » Addons » Search for “Zapier Addon” and click on “Install Addon”

make sure the Status is set to “Active”

Now, Go again in Dashboard » WPForms » Settings and (1) click on the Integrations tab. Then, (2) click on the Zapier Addon option to open settings and (3) copy/save Zapier API Key you will need this later

How to Connect & Create ZAPs
If you previously have used Zapier then log into your Zapier account. and If you don’t have an account with Zapier yet, Don’t worry you can create free account HERE...in minutes.

After you’ve logged into your account, Click on the “MAKE A ZAP” black button in the upper left corner. This will open a setup page where you can create your first zap.

In the Next window, (1) you can Change the Name of your ZAP, if wanted. (2) Search for WPForms in the search box, Then click on WPForms from the search result.

Once you’ve (1) selected WPForms, Choose Trigger Event. (2) Select New Form Entry and (3) click on Continue button to go to next step.

Now in the step, you will connect Zapier app to WPForms on your website, (1) click the Sign in to WPForms button.
A popup window will appear, (1) Here, you’ll need to add your API Key which you have copied/saved earlier. (2) in the 2nd box enter the full URL of your website and add forward slash (/) at the end (http://youdomain.com/), (3) click the Yes, Continue button.

When your site is connected, Zapier will then prompt you to choose which account to use for this Zap. (1) Click on the dropdown menu to select your site, and then (2) click Continue.

in the next step, you will be able customize Form Entries, now (1) Select the form you want to use for this ZAP, and (2) click Continue.

In this step you will be able to pull in sample entries to test your connection. (1) Click on Test & Trigger or the Test & Review button before continuing. testing will ensure that the integration is fully connected. (make sure the form you select for this ZAP contains some entries)

Follow prompted steps to pass form data to service of your choice and after successful connection with your form, the next steps will vary and depends on the service you want to integrate. In the steps explained above Zapier is connected to the WPForms plugin on our website now.
You can connect Zapier with more than 3,000 apps, its not possible to show all of them in one blog post, so for this tutorial I have selected “Save new WPForms entries to a Google Sheets spreadsheet” and now lets go and connect WPForms to Google Sheets.
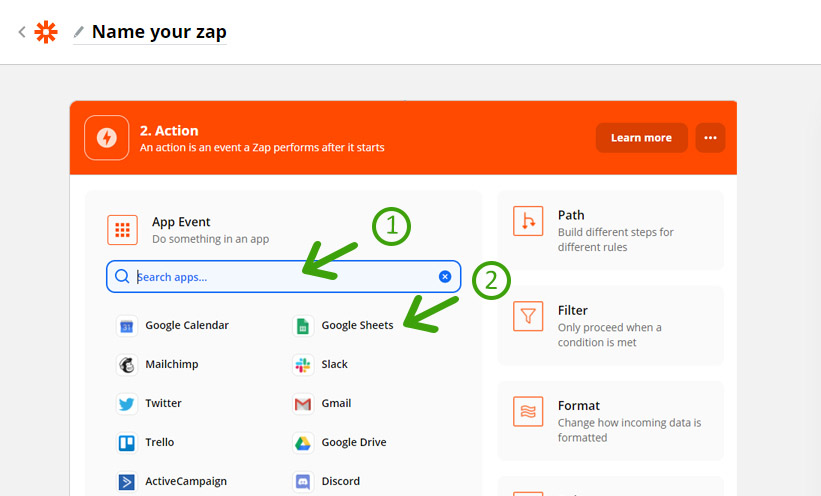
(1) in the search box, Search for Google Sheets, Then (2) click on Google Sheets from the search result.

in this part, the first step is to choose Google Sheets as the action app. (1) Enter Google Sheets in search bar, and then, click on it when it shows up. to add form entries to Google Sheets add Action Event. (2) choose Create Spreadsheet Row and (3) click Continue.

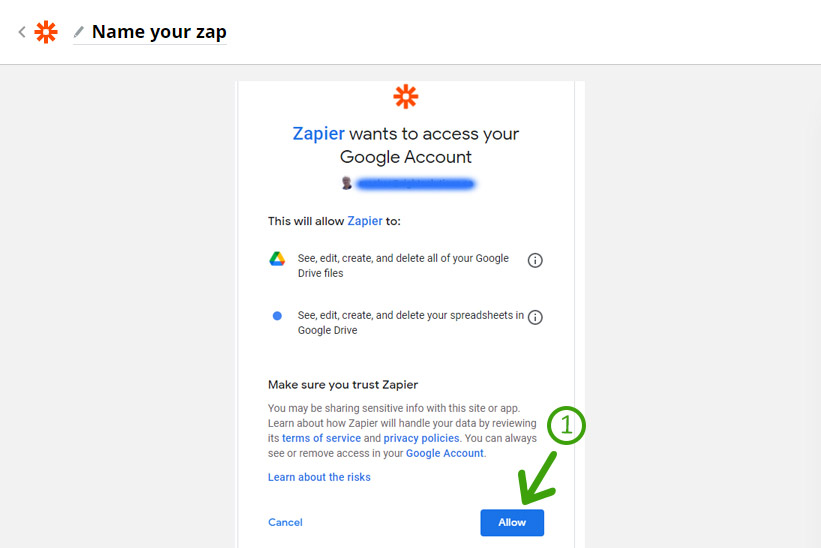
A new screen will popup, saying “Zapier wants to access your Google Account” (1) click on “Allow” button
if you have more than one google account, select the one you want to connect here and (1) click on Continue button

(1) Select the Google Drive, if you have more than one Work Sheet in you spreadsheet (2) choose the Worksheet that you want to connect, (3) enter text or insert data by clicking on the remaining fields. When you are done with all the field, click on Continue bottom,
Note: Make sure the Google spreadsheet you want to import data in has the corresponding Header row

Next window will display the fields of the form and at the bottom two options to “Test & Review” and Test & Continue, (1) click on Test & Continue

if the Test was Successful, you can you can turn on the ZAP by (1) clicking on “Turn on Zap” button.

you will get a prompt to copy or share the link option, close it, a conformation message will show that your ZAP is ON

with this, we completed the connection of WordPress form with Google Sheets and all the future entries will be added to the specified spreadsheet in Google Sheets. Here is an example of spreadsheet on my Google Drive after receiving posted data from WPForms connected with my website. Cheers!!


